Monday, January 2, 2012

New Academy Workspace

Below is the building that houses my studio gallery on the ground floor. I recently exercised my lease option on the second floor with intention to rent out private studios in the smaller rooms and use the main larger room as a LOFT for visiting artist workshops and open studio painting sessions. Below are some pictures of the main LOFT and common areas for use by workshop guests and studio tenants.


Building

Main Loft

This is the main common area that will be used to greet guests, register students, and as a break area. Notice the small kitchen available in the next room as well


Very nice bathroom too!

Thursday, July 14, 2011

Cradling of Quick Stop


Quick Stop was painted on a Masonite art board and after dry is being cradled so that it can be presented unframed. With the texture, when the edges are finished and the painting is varnished, laying flat with the layers of texture on the edges it looks like a piece of antique tile. I love this part of the art "manufacturing" process. It is the "craftsman" part of being an artist where one takes control of the material, substrate, presentation, and in the end creates something that is uniquely their own.

http://adrosenoff.fineartstudioonline.com/workszoom/621422

Saturday, July 2, 2011

New Studio & Gallery

We opened my new Studio and Gallery in Kirkland. Lots of work getting ready. Very enjoyable space to work and show my artwork.


Look at the Before and After Pics for Fun.


If you are in the area, please stop by!


Saturday, May 28, 2011

Salavation

I did this still life painting as a prop for the stage play (see earlier post). It got damaged during normal handling (probably by me!) and I decided to salvage the panel. See below.
I scraped all of the dried but pliable paint off, and then took a belt sander to it. You can still see remnants of the painting on the panel now. I will reuse the panel and paint over it, hoping that someday when I'm famous (and not yet dead), that the painting will be a southebys and someone will do an ultrasound on it and realize that there is a "ghost" painting underneath and it will be all the talk!


This is the painting I did today on the resurected panel

Hidden Picket Fence
30" x 40" Palette Knife Oil on Cradled Panel


Saturday, May 7, 2011

Pike Place Market

Finished this piece at a painting demonstration today for ArtEast at an art and craft festival in Issaquah. My allotted time was 1:30 and I ran 15 min over ;~/. Start to finish 1:45. I love the ones that paint fast!


Pike Place Market 19" x 21" Palette Knife Oil on Cradled Panel

Saturday, April 23, 2011

Walking Pine Street

I completed this painting during a painting demonstration this afternoon at Bellevue Art & Frame. The painting is now in a silent auction to benefit the Bellevue Schools Foundation

Walking Pine Street 16" x 20" Palette Knife Oil on Cradled Panel

Sunday, April 17, 2011

Painting Demonstration at Wine and Cheese Party

I did this painting today as a demonstration at a wine and cheese party at my wife's work. Love to meet new art enthusiasts (and drink good wine while painting)!

Quick Stop 22" x 18" Palette Knife Oil on Cradled Panel

Friday, April 8, 2011

Painting Demonstration for Palette Knife Painting Class

This is the painting I did for a painting demonstration for the Palette Knife Painting Class I am teaching tomorrow. I had a great engaged and inquisitive audience. Thank You!

Light Traffic 18" x 18" Palette Knife Oil on Panel

Friday, April 1, 2011

Art Education Open House

ArtEast did an Art Education Open House this evening. This is my spot on the table where I brought in a couple of examples of my work and talked about the class I will be teaching next weekend ;~).


Saturday, March 12, 2011

Bicycles

I'm hooked. I love painting bicycles.


Coaster Brakes
35" x 24"
Palette Knife Oil on Cradled Panel


Tree Hugger
21" x 21"
Palette Knife Oil on Cradled Panel


Quick Stop
22" x 18"
Palette Knife Oil on Cradled Panel


Left Propped Up
48" x 32"
Palette Knife Oil on Cradled Panel

Racer
48" x 32"
Palette Knife Oil on Cradled Panel

Tokyo Three Speed
40" x 30"
Palette Knife Oil on Cradled Panel

Cafe Parking
40" x 48"
Palette Knife Oil on Cradled Panel

Holding up the Fence
36" x 36"
Palette Knife Oil on Cradled Panel

Georgetown Cruisers
48" x 36"
Palette Knife Oil on Cradled Panel

Bike in Late Afternoon
18" x 18"
Palette Knife Oil on Cradled Panel

Second Hand Bike
18" x 18"
Palette Knife Oil on Cradled Panel

Tuesday, February 15, 2011

Largest Painting

I completed the largest painting I've ever done, and  . . .  painted on one of the panels I built myself. As you can see, anything larger would be a challenge from a workspace standpoint.

Sunday, January 30, 2011

Drying Racks

My painting panel drying rack for larger paintings. The triangular design fits all sizes. The smaller ones just slide in farther. This will hold a 24" x 24" or a 48" x 72"!


Drying Racks for Smaller Paintings (on masonite gesso panels). These are converted desktop file folder organizer from an office supply store. Works perfectly. The ones on the right are a new set that I added to keep up with my painting production! Note that I do have to put a piece of card stock paper under the 5" x 7" ones, otherwise they would fall through.


New Painting Panels

I've resorted to building my own painting panels. I'm able to achieve better quality and it solves the issue about not being able to get the larger sizes. Total materials cost for a 4' x 4' panel is about $27. Retail is ~ $170. I never wanted to get into the panel manufacturing business (I'd rather be painting) but you do what ya gotta do ;~).

Below is the largest panel (48" x 60") I've attempted so far. It's going really well and I'm actually enjoying doing it. I can see where artists enjoy the process of building panels/stretching canvas. It's all part of the process of making art.

Finished 48" x 60" Panel, ready for final sanding and Gesso primer. Total Investment about $30 in materials and 2.5 hrs time.


Monday, January 10, 2011

Mykonos for my Daughter

My 19 year old daugher is nuts about Greece, so I did this painting of Mykonos for her. I love the balance of warm and cool tones in this piece.

Monday, January 3, 2011

Seattle Skyline Paintings

So about 3 weeks ago I did this painting of the Seattle Skyline from the Capital Hill area and a friend saw it and suggested that I paint the city from the opposite side in a similar size. So . . . below is Seattle from the South and Seattle from the North, both in 11" x 14" format. They are similar but different. I love the small differences. It's subtle, but the view from the South is daytime with a Southerly sun (sun behind you), and the view from the North is slightly backlit with a Southerly sun (sun in your face). It affects the depth and contrast of the depictions. I like the richness of the color and contrast in the first painting, and also like the subtlety and almost tapestry like texture in the second painting. What fun!


New Paintings This weekend

Completed two larger works this weekend.

This first one is a tree in the old cemetary in Auburn. I didn't paint in the headstones, preferring a less macabe representation. Still has an erie, ethereal type of presence. This is the second painting I've done of this tree, and find it very compelling.

Majestic Oak 36" x 48" Palette Knife Oil on Cradled Panel

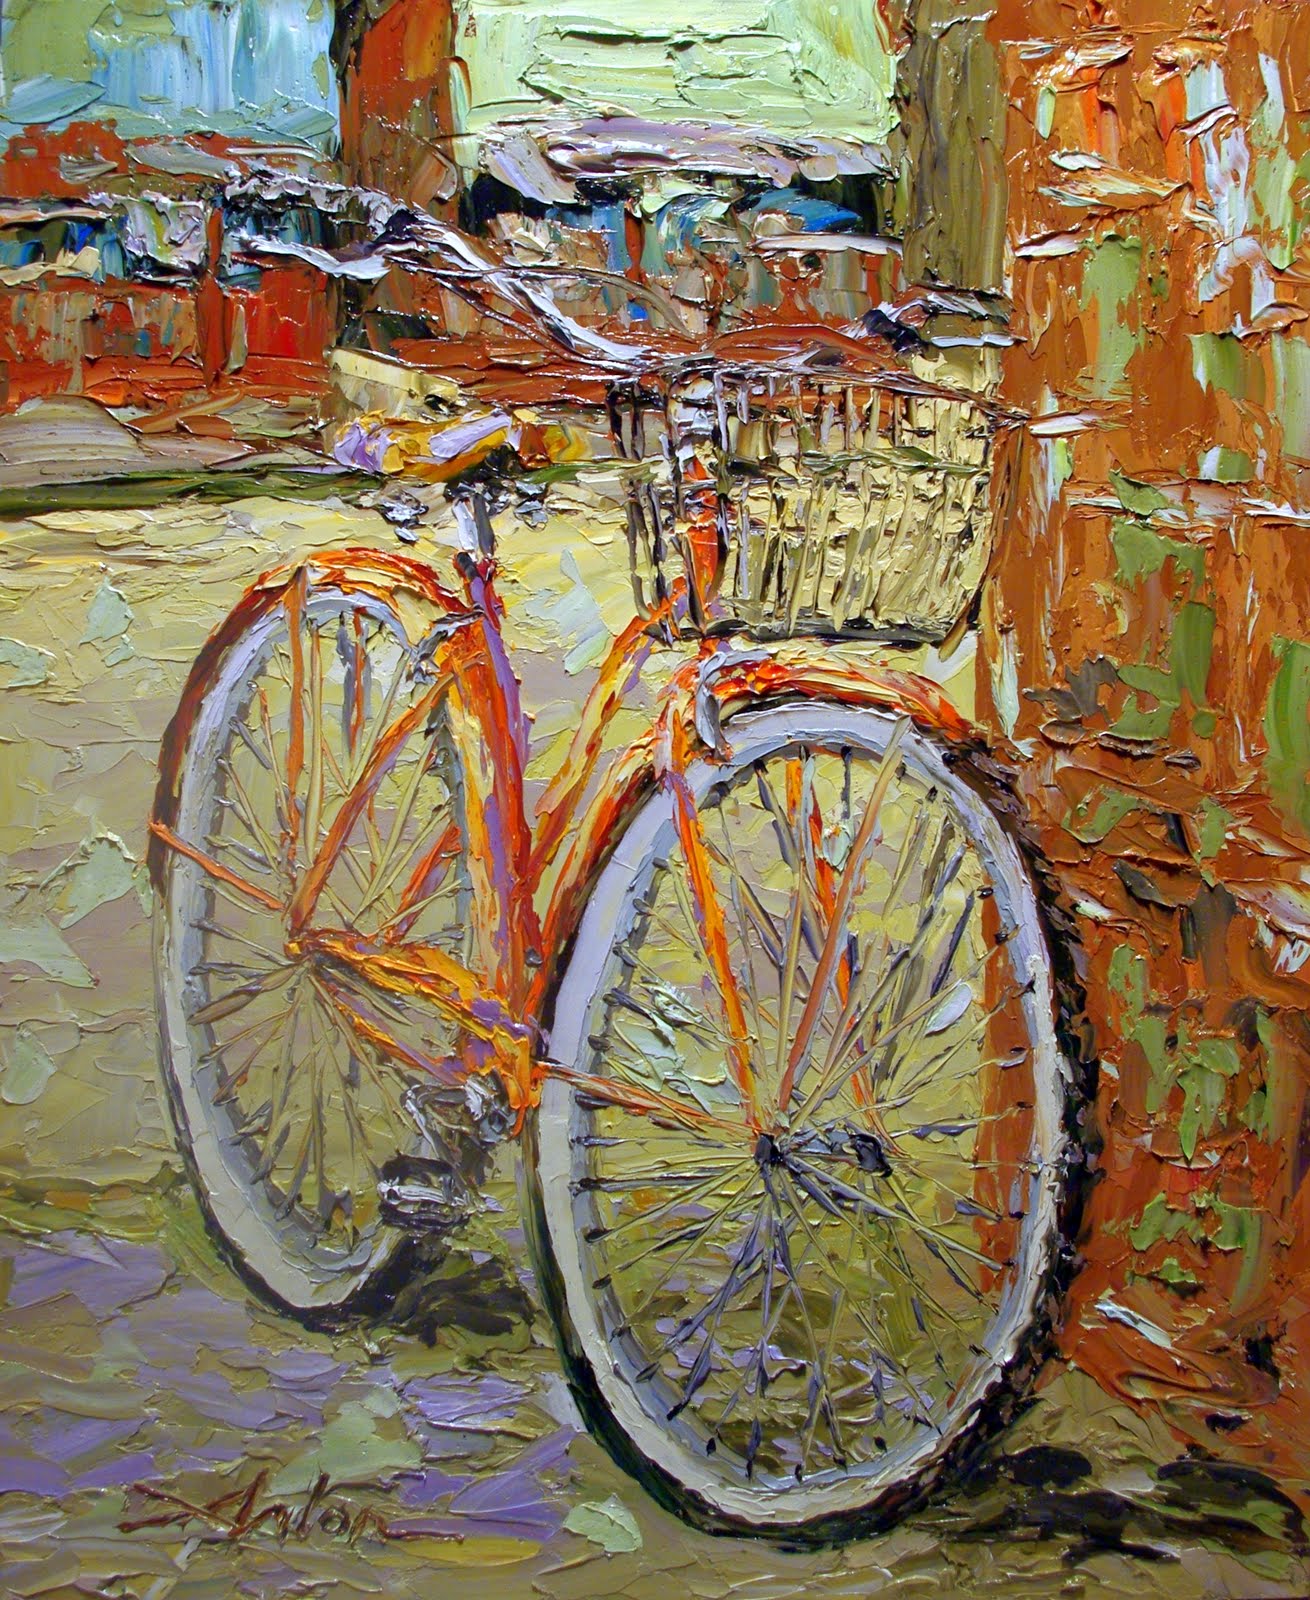
This second one is from a scene Debbie and I saw while stopped at a Garage Sale in Redmond, WA. The bike had a very rusty chain and spokes, so I'm left to believe it is here for yard decoration purposes only. The driveway to the right was sloped, which allowed the rather unusual perspective and angles, which were part of the appeal of the scene.

Holding up the Fence 36" x 36" Palette Knife Oil on Cradled Panel

Sunday, December 26, 2010

I'm working on a couple of pieces to support the stage set for an upcoming stage play called "Three Screams", which is a script associated with Edvard Munch's painting titled "The Scream".

Below is the first painting, which specifically had to be a still life of a single daisy in a vase. The second painting is a large painting on canvas (which I don't normally do) which will be torn up and destroyed as part of the script (which I sometimes do ;~).

Solitary Daisy Still Life 40" x 30" Palette Knife Oil on Cradled Panel

Below is the large painting for screen set to be "torn up" as part of the stage set. Set designer asked for a big daisy that took up most of the canvas. I think I achieved that! I hope she is happy with it! I can't wait to see the play.


Sunday, December 19, 2010

New works from new studio setup

I did twelve (12!) paintings this weekend using my new setup, and I could not be more pleased. A couple of the pieces were slight departures for me, and I am very pleased with the results. One of the things I did this weekend was set up a computer and monitor in my studio. Up until now, I generally painted from 4" x 6" photographs. It is nice to have a much larger image to reference to while painting.


Thursday, December 16, 2010

Paint Preservation on Palette

One of the challenges every artist faces is paint drying out in between sessions. Up until now, I have been placing plastic wrap (like the stuff you cover food with) over the paint and pressing out the air. It works about 80% effective, but the paint still stiffens up more than I would like, and eventually dries up and I have to start over and scrape off the palette. I probably throw away $300 worth of dried up oil paint each year. I do use a sheet of plate glass 24" x 36" x 3/8" for a palette. Glass makes a wonderful palette because it is smooth and always cleanable.


Many artists freeze their oil pallete to keep it from drying out, but I use a palette that is simply too large to place in a freezer. I also met another artist who put their oil palette into a tray of water. That seemed like a good idea. I thought my palette was too big to do that, but I'm going to try it anyway and just finished my setup for it. I bought a 29" x 41" condensation drip pan from Grainger Industrial Supply http://www.grainger.com/Grainger/DIVERSITECH-Drain-Pan-3HAK1?Pid=search and intend to keep it filled with water, raise my oil palette out of the water to paint (slide a couple blocks of wood underneath it) or drain the water through the drain hole in the drip pan, and then lower it into the water in between sessions with the expectation that the paint will not dry out at all while underneath the water. I am really anxious to see how this works out. I put a piece of opaque white plastic material under the glass just for light background for color mixing. I am wondering if I will have to lay a piece of plastic over the water to curb evaporation. Probably not in Seattle. Humidity here is ALWAYS above 85%. Phoenix would be a different story. For my artist friends, I'll let you know how it works. Below is the tray setting on the table I use for a palette, with the glass sitting down in the tray now.


First Submersion. All seems well. Next time I drain the water, I want to level the table top. It is sloped slightly. Should have done that first, but no big deal. Today I lift the palette out of the water. Will be interesting to see how well the paints recover from being submerged.

Results: Today I did 4 paintings after resurecting my oil paint from submersion of the palette into water. I will put lessons learned below, but the paint maintained PERFECT consistency. Better than I had hoped for. Not dried out or stiff at all, which is what I was hoping for.

Lesson's learned:

1. Small amounts of dust settles on top of the water, and when the water is drained, I could see the dust settling onto the paint. I didn't noticed any degradation of the pigment, but didn't like seeing that happen. I am tempted to buy another plastic drip pan and turn it upside down and use it as a cover (above but not touching the water.) This is going to be important going forward as I also do shop work in my studio (sawing, sanding) which produces more dust and debris than usual.

2. I should have leveled the table prior. It's not off much, only a degree or two, but water is perfectly level and I can see where the table is slighly off. I did have to mash down a couple of the piles of paint so they would be under the water on the shallow end.

3. Evaporation caused the water level to go down very slightly. I can see that if a palette were left under water unattended, that someone would have to occasionally add water to curb evaporation.

Results Overall: Excellent!!! Better than even hoped for!